![]()
APIFlask 中文文档
![]()
![]()
本项目已经完成翻译,感谢各位参与者的贡献。如果你发现翻译有误,欢迎提交 issue 或 PR。
翻译贡献者
- Home (index.md) @greyli
- Documentation Index (docs.md) @rice0208
- Migrating from Flask (migrating.md) @z-t-y
- Basic Usage (usage.md) @Farmer
- Request Handling (request.md) @rice0208
- Response Formatting (response.md) @Tridagger
- Data Schema (schema.md) @rice0208
- Authentication (authentication.md) @z-t-y
- OpenAPI Generating (openapi.md) @rice0208
- Swagger UI and Redoc (api-docs.md) @Tridagger
- Configuration (configuration.md) @z-t-y
- Error Handling (error-handling.md) @yangfan9702
- Examples (examples.md) @Tridagger
- Comparison and Motivations (comparison.md) @Tridagger
- Authors (authors.md) @greyli
- Changelog (changelog.md) @greyli
- Contributing Guide (contributing.md) @greyli
介绍
APIFlask 是一个轻量的 Python web API 框架,基于 Flask 和 marshmallow-code 项目实现。它易于使用,高度可定制,可搭配任意 ORM/ODM 框架,并且和 Flask 生态 100% 兼容。
APIFlask 提供了下面这些主要特性:
- 为视图函数实现了更多的语法糖(
@app.input()、@app.output()、@app.get()、@app.post()等) - 自动化请求验证和反序列化(基于 webargs)
- 自动化响应格式化和序列化(基于 marshmallow)
- 自动生成 OpenAPI 规范 (OAS,原 Swagger 规范)文档(基于 apispec)
- 自动生成交互式 API 文档(基于 Swagger UI 和 Redoc)
- API 认证支持(基于 Flask-HTTPAuth)
- 自动为 HTTP 错误生成 JSON 响应
要求
- Python 3.8+
- Flask 2.0+
安装
Linux 和 macOS:
$ pip3 install apiflask
Windows:
> pip install apiflask
链接
- 网站:https://apiflask.com
- 文档(英文):https://apiflask.com/docs
- 文档(中文):https://zh.apiflask.com/docs
- PyPI:https://pypi.python.org/pypi/APIFlask
- 变更日志:https://apiflask.com/changelog
- 源代码:https://github.com/apiflask/apiflask
- Issue 追踪:https://github.com/apiflask/apiflask/issues
- 论坛(英文):https://github.com/apiflask/apiflask/discussions
- 论坛(中文):<https://codekitchen.community>
- Twitter:https://twitter.com/apiflask
示例
from apiflask import APIFlask, Schema, abort
from apiflask.fields import Integer, String
from apiflask.validators import Length, OneOf

app = APIFlask(__name__)

pets = [
    {'id': 0, 'name': 'Kitty', 'category': 'cat'},
    {'id': 1, 'name': 'Coco', 'category': 'dog'}
]


class PetIn(Schema):
    name = String(required=True, validate=Length(0, 10))
    category = String(required=True, validate=OneOf(['dog', 'cat']))


class PetOut(Schema):
    id = Integer()
    name = String()
    category = String()


@app.get('/')
def say_hello():
    # 返回字典或列表等同于使用 jsonify()
    return {'message': 'Hello!'}


@app.get('/pets/<int:pet_id>')
@app.output(PetOut)
def get_pet(pet_id):
    if pet_id > len(pets) - 1:
        abort(404)
    # 你也可以直接返回一个 ORM/ODM 模型类实例
    # APIFlask 会将其序列化为 JSON 格式
    return pets[pet_id]


@app.patch('/pets/<int:pet_id>')
@app.input(PetIn(partial=True))  # -> json_data
@app.output(PetOut)
def update_pet(pet_id, json_data):
    # 验证且解析后的请求输入数据会
    # 作为一个字典传递给视图函数
    if pet_id > len(pets) - 1:
        abort(404)
    for attr, value in json_data.items():
        pets[pet_id][attr] = value
    return pets[pet_id]
注意:input、output、doc 和 auth_required 装饰器现在移动到了程序/蓝本实例上,
如果你使用 APIFlask 0.12 及以下版本,则需要使用独立的装饰器具体参考
这里。
你也可以通过 MethodView 编写基于类的视图(class-based views)
from apiflask import APIFlask, Schema, abort
from apiflask.fields import Integer, String
from apiflask.validators import Length, OneOf
from flask.views import MethodView

app = APIFlask(__name__)

pets = [
    {'id': 0, 'name': 'Kitty', 'category': 'cat'},
    {'id': 1, 'name': 'Coco', 'category': 'dog'}
]


class PetIn(Schema):
    name = String(required=True, validate=Length(0, 10))
    category = String(required=True, validate=OneOf(['dog', 'cat']))


class PetOut(Schema):
    id = Integer()
    name = String()
    category = String()


class Hello(MethodView):

    # 使用 HTTP 方法名作为类方法名
    def get(self):
        return {'message': 'Hello!'}


class Pet(MethodView):

    @app.output(PetOut)
    def get(self, pet_id):
        """Get a pet"""
        if pet_id > len(pets) - 1:
            abort(404)
        return pets[pet_id]

    @app.input(PetIn(partial=True))
    @app.output(PetOut)
    def patch(self, pet_id, json_data):
        """Update a pet"""
        if pet_id > len(pets) - 1:
            abort(404)
        for attr, value in json_data.items():
            pets[pet_id][attr] = value
        return pets[pet_id]


app.add_url_rule('/', view_func=Hello.as_view('hello'))
app.add_url_rule('/pets/<int:pet_id>', view_func=Pet.as_view('pet'))
或使用 async def(Flask 2.0)
$ pip install -U "apiflask[async]"
import asyncio

from apiflask import APIFlask

app = APIFlask(__name__)


@app.get('/')
async def say_hello():
    await asyncio.sleep(1)
    return {'message': 'Hello!'}
把代码保存到 app.py,然后使用下面的命令运行:
$ flask run --debug
现在访问 http://localhost:5000/docs 查看交互式 API 文档(Swagger UI):
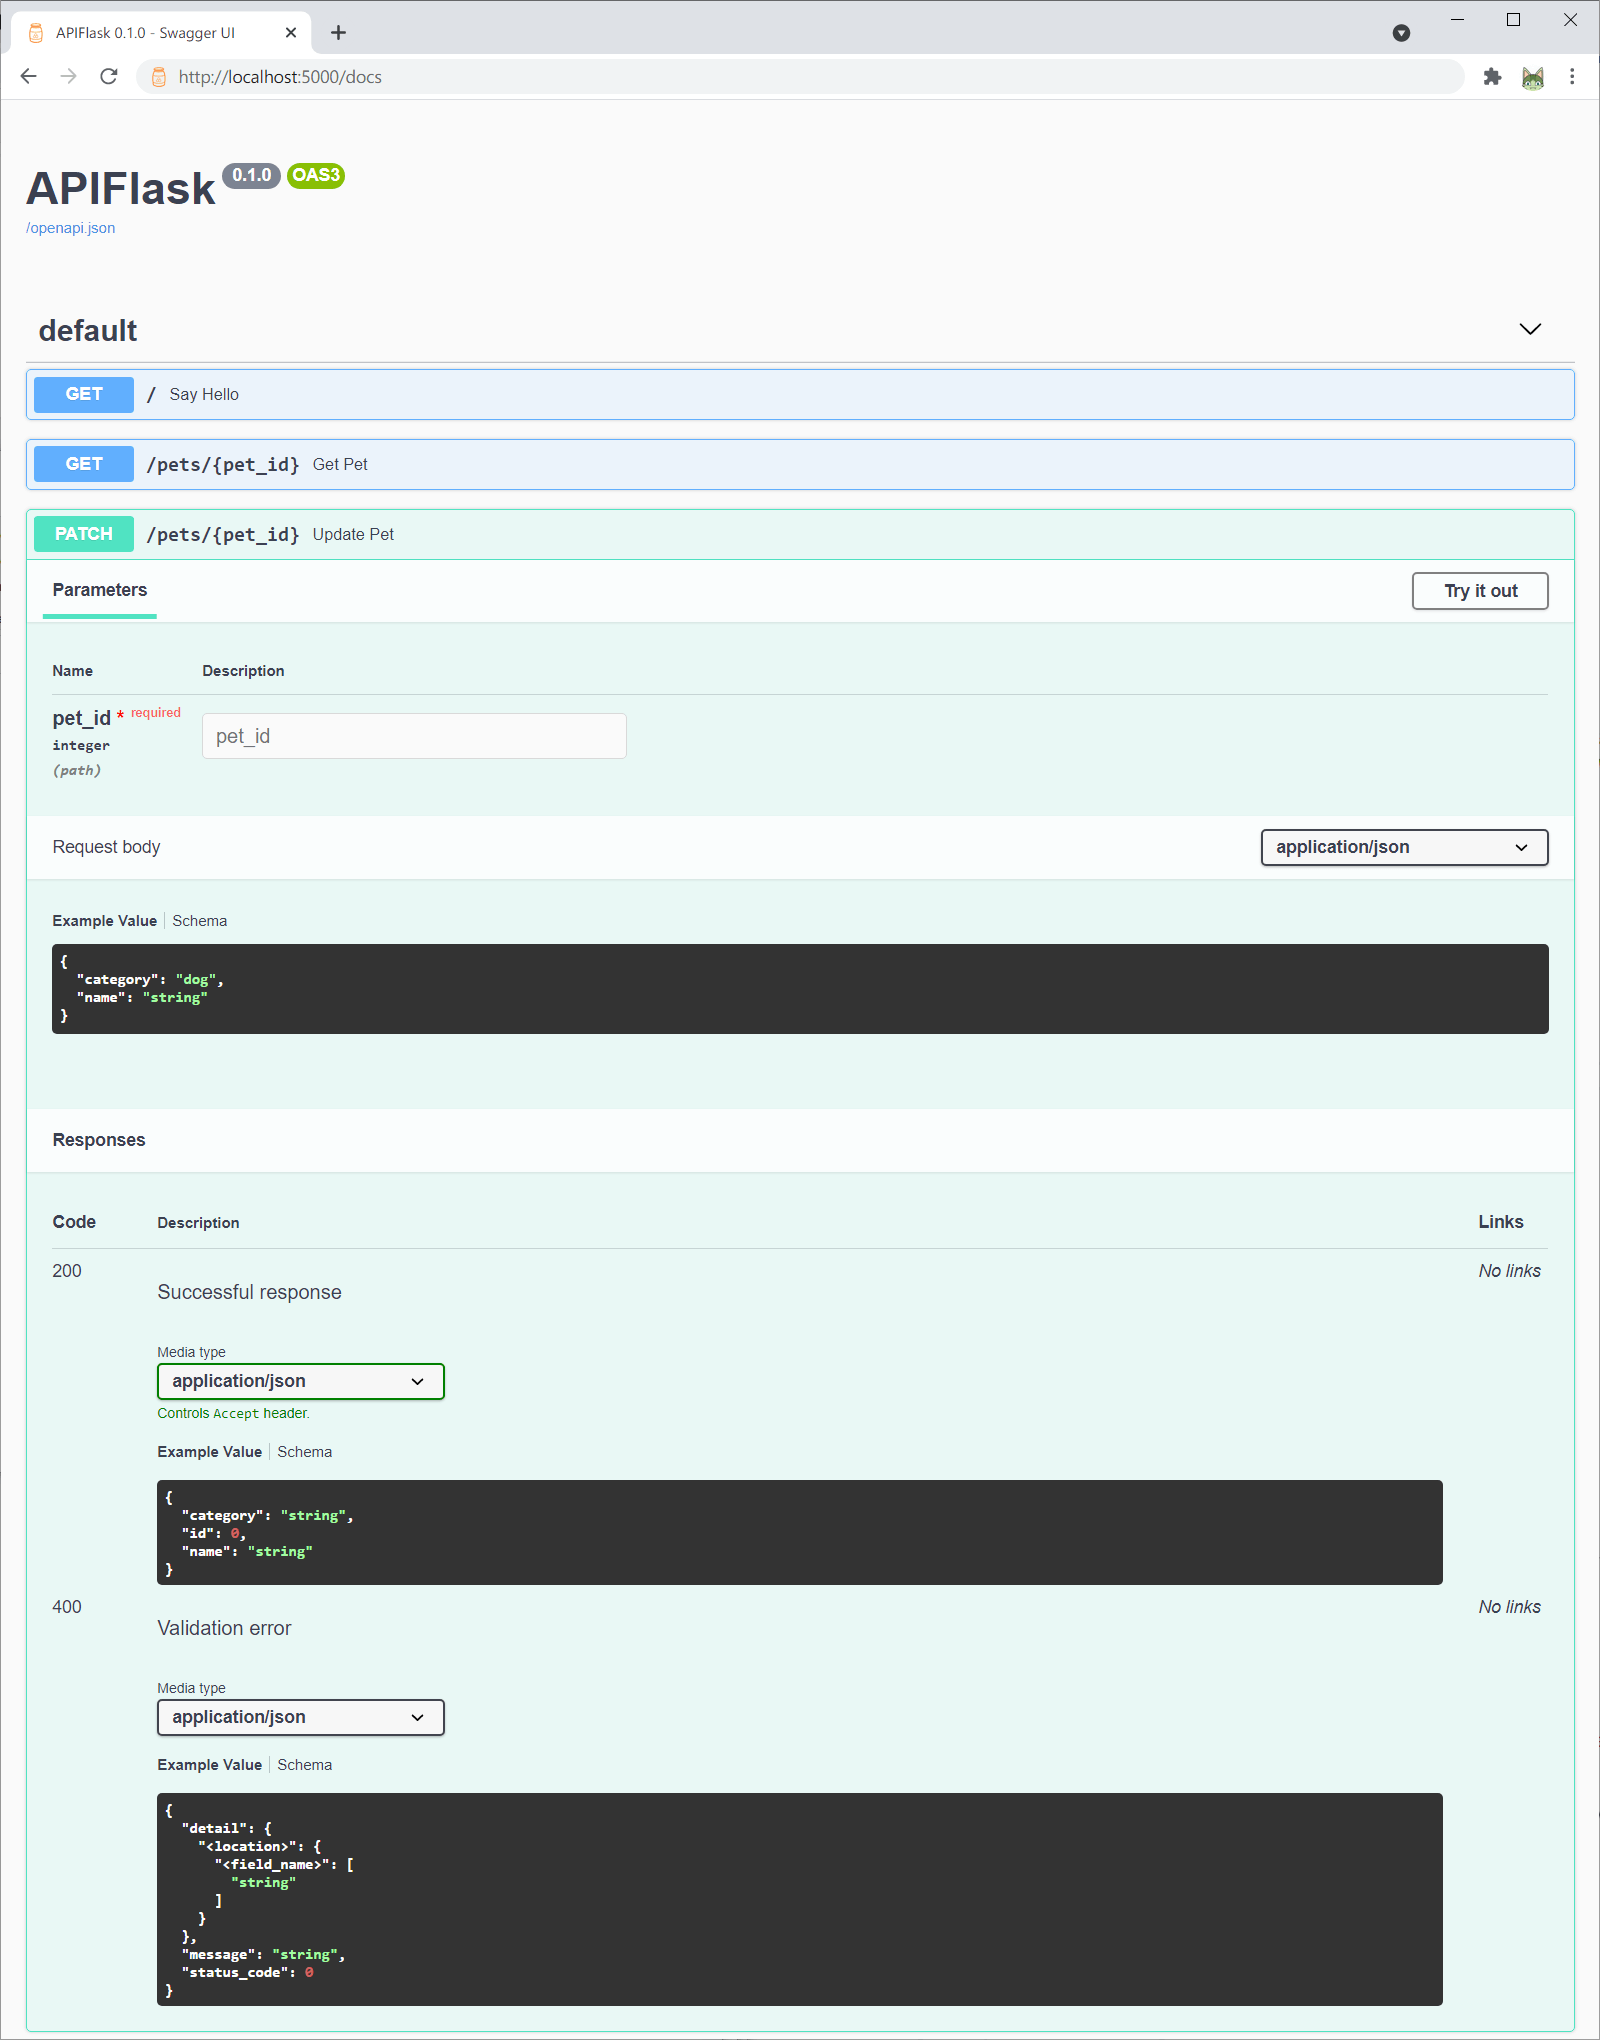
或者你可以在创建 APIFlask 实例时通过 docs_ui 参数来设置 API 文档 UI
(APIFlask 1.1+):
app = APIFlask(__name__, docs_ui='redoc')
现在 http://localhost:5000/docs 将会使用 Redoc 渲染 API 文档:
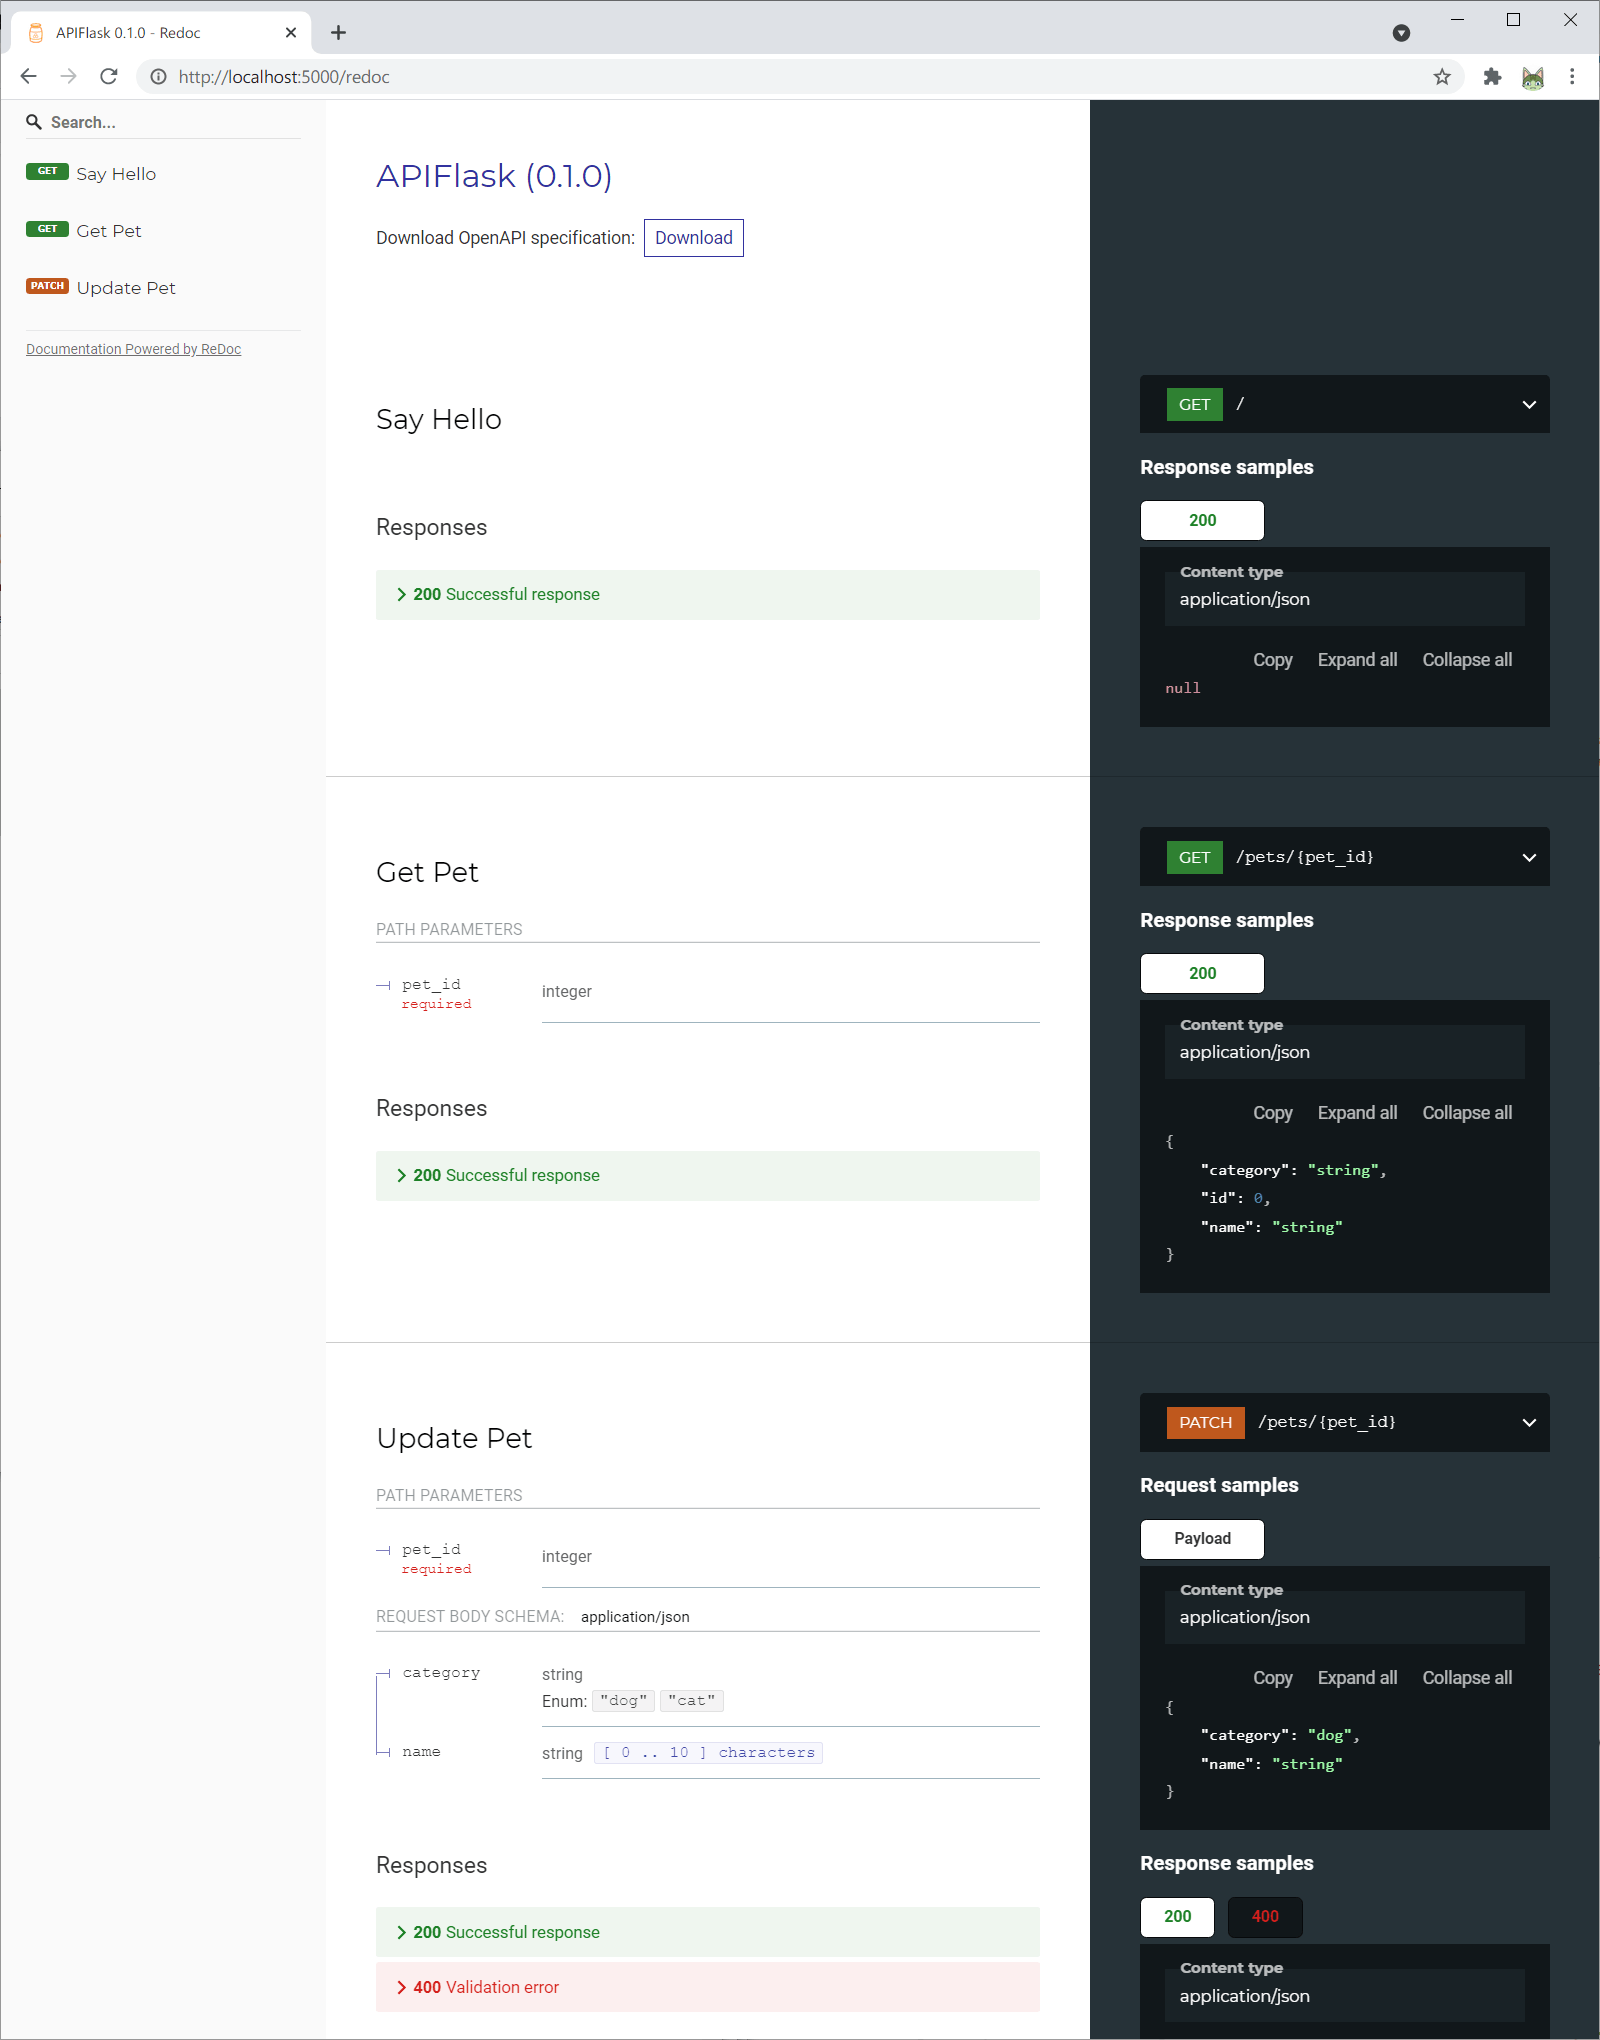
支持的 docs_ui 选项(API 文档库)包括:
swagger-ui(默认值):Swagger UIredoc:Redocelements:Elementsrapidoc:RapiDocrapipdf:RapiPDF
注意:如果 API 文档页面加载不出来,大概率是因为 API 文档资源文件对应的 CDN 提供商被政府封锁,可以尝试 更换其他 CDN 提供商, 或是 使用本地资源。下面是设置自定义资源 URL 的示例(可直接复制使用):
# 放到程序实例定义下
app.config['SWAGGER_UI_BUNDLE_JS'] = 'https://cdnjs.cloudflare.com/ajax/libs/swagger-ui/4.11.1/swagger-ui-bundle.min.js'
app.config['SWAGGER_UI_CSS'] = 'https://cdnjs.cloudflare.com/ajax/libs/swagger-ui/4.11.1/swagger-ui.min.css'
app.config['SWAGGER_UI_STANDALONE_PRESET_JS'] = 'https://cdnjs.cloudflare.com/ajax/libs/swagger-ui/4.11.1/swagger-ui-standalone-preset.min.js'
app.config['REDOC_STANDALONE_JS'] = 'https://cdn.redoc.ly/redoc/latest/bundles/redoc.standalone.js'
自动生成的 OpenAPI 规范文件可以在 http://localhost:5000/openapi.json 访问到。你也可以通过 flask spec 命令 获取:
$ flask spec
更多完整的示例程序见 /examples。
和 Flask 的关系
APIFlsak 是 Flask 之上的一层包装。你只需要记住下面几点区别(阅读 从 Flask 迁移 了解更多细节):
- 当创建程序实例时,使用
APIFlask而不是Flask。 - 当创建蓝本实例时,使用
APIBlueprint而不是Blueprint。 - 当创建类视图时,使用
apiflask.views.MethodView而不是flask.views.MethodView。 - APIFlask 提供的
abort()函数(apiflask.abort)返回 JSON 错误响应。
下面的 Flask 程序:
from flask import Flask, request
from markupsafe import escape

app = Flask(__name__)

@app.route('/')
def hello():
    name = request.args.get('name', 'Human')
    return f'Hello, {escape(name)}'
转换到 APIFlask 只需要两步:
from apiflask import APIFlask  # step one
from flask import request
from markupsafe import escape

app = APIFlask(__name__)  # step two

@app.route('/')
def hello():
    name = request.args.get('name', 'Human')
    return f'Hello, {escape(name)}'
简单来说,为了让使用 Flask 开发 Web API 更容易,APIFlask 提供了 APIFlask 和 APIBlueprint 来扩展 Flask 的 Flask 和 Blueprint 对象,并且添加了一些有用的功能函数。除了这些,你实际上是在使用 Flask。
和 marshmallow 的关系
APIFlask 接受 marshmallow schema 作为数据 schema,它使用 webargs 验证请求数据是否符合 schema 定义,并且使用 apispec 生成 schema 对应的 OpenAPI 表示。
你可以像以前那样构建 marshmallow schema。对于一些常用的 marshmallow 函数和类,你可以从 APIFlask 导入:
apiflask.Schema:schema 基类。apiflask.fields:marshmallow 字段,包含来自 marshmallow、Flask-Marshmallow 和 webargs 的字段类。注意,别名字段(Url、Str、Int、Bool等)已被移除。apiflask.validators:marshmallow 验证器投票为验证器相关的 API 使用更好的命名)。
from apiflask import Schema
from apiflask.fields import Integer, String
from apiflask.validators import Length, OneOf
from marshmallow import pre_load, post_dump, ValidationError
致谢
APIFlask 早期版本基于 APIFairy 改写,并且受到 flask-smorest 和 FastAPI 的启发(阅读 对比和动机 了解这些项目之间的区别)。